Blog
How To Start A Blog
The Ultimate Beginner's Guide
Posted By: Twenty Three & Ivy
-This post may contain affiliate links in which I would receive a small commission if you purchase through a link, at no cost to you-
Table Of Contents
- Ready To Start Your Blogging Journey?
- I. Choose Blog Niche
- II. Create Blog
- Create Domain Name
- Sign Up For Hosting (BlueHost)
- Choose Blogging Platform (WordPress)
- WordPress Guide
- Setup Website & Install Theme
- Installing Elementor
- III. Create Content
- Write Blog Posts
- IV. Design Website
- V. Gain Traffic
- VI. Monetize
Ready To Start Your Blogging Journey?
If you’re anything like me, you’ve probably spent a great deal of spare time scrolling online, searching ‘how to make money online’. Maybe you’re working at a job that you can’t stand, hate having to commute to work, want to work remotely or just would love to be your own boss.
Creating a blog can solve so many problems that the 9-5 job creates for us. Everything is up to you!
You can decide what to blog about, when, where and how to blog. The internet is vast, and people are always looking for new information.
The fact that there are tons of bloggers out there only proves that this is a possible career path, and the internet is not going away any time soon. The number of bloggers out there should be looked at as a positive thing and not as competition.
Think about how many different recipes for one thing you can find on Pinterest, it’s kind of like that. You don’t need a totally unique niche, you just need to be passionate about what you’re writing about to gain readers.
You might be thinking, yeah blogging sounds great…. But I don’t know the first thing about how to start. We’ve all been there.
Like any job you won’t know what you’re doing right from the start, you’ll need to learn as you go. The great thing about starting is you do not need to have any prior experience or knowledge of websites or blogging.
I didn’t know the first thing about blogging, completely did not realize all the links I read on Pinterest were all someone’s blog!
Sounds crazy but that’s the level of starting I was out. So if I can do it, so can you.
The best way to learn is just from other bloggers who have already figured this out. I spent countless hours on other blogs and Youtube to piece together all the information I needed to know to create my blog.
You will of course see all of those ‘How I make 10K a month blogging’ posts and instantly be drawn in… just to be overwhelmed with all the information.
So start small.
You might not make thousands your first couple of months (although you might) but start off with a small goal of making enough money from your blog to pay for gas or weekly groceries.
Think of any small amount of income as a payoff for starting a new source of income and you will be pleasantly surprised.

Lets Dive Into The Steps
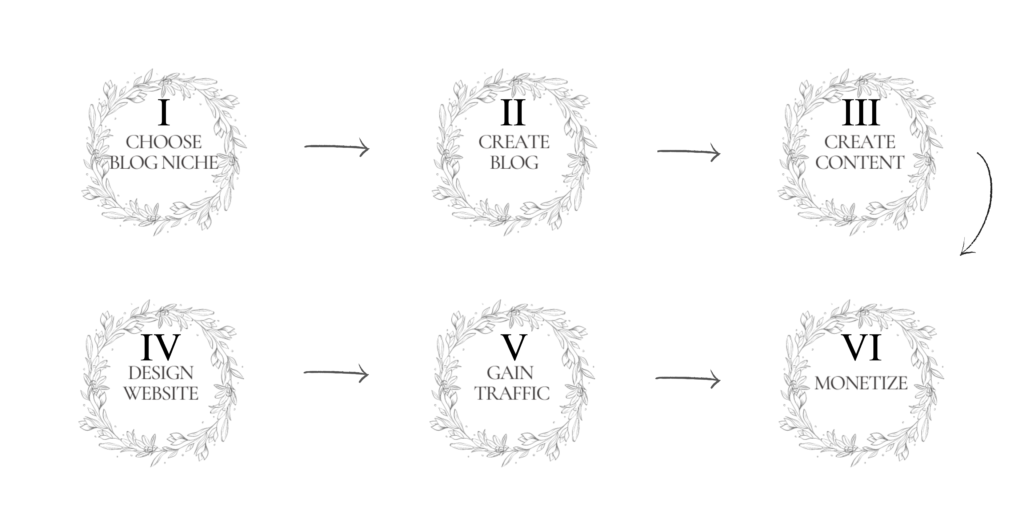
I. Choose Blog Niche
Your niche will be the overall theme of what your posts are about. For example some common ones are finance, health & fitness, travel, food or parenting to name just a few.
The most important thing is to not let picking a niche hold you back from starting a blog right now.
You can always change your niche, or once you gain traction with one niche you can add another to your blog.
Make sure to pick a topic that you’ll enjoy writing about because you’ll need to be able to create a lot of content on that subject. You also do not need to be an expert either, you can do research as you go and learn what you’ll be writing about.
The best way to choose a niche is to think about what you already search for online. If you’re searching for something, chances are there are plenty of other people as well.
The main goal is to think of an issue and provide a solution to that for others.
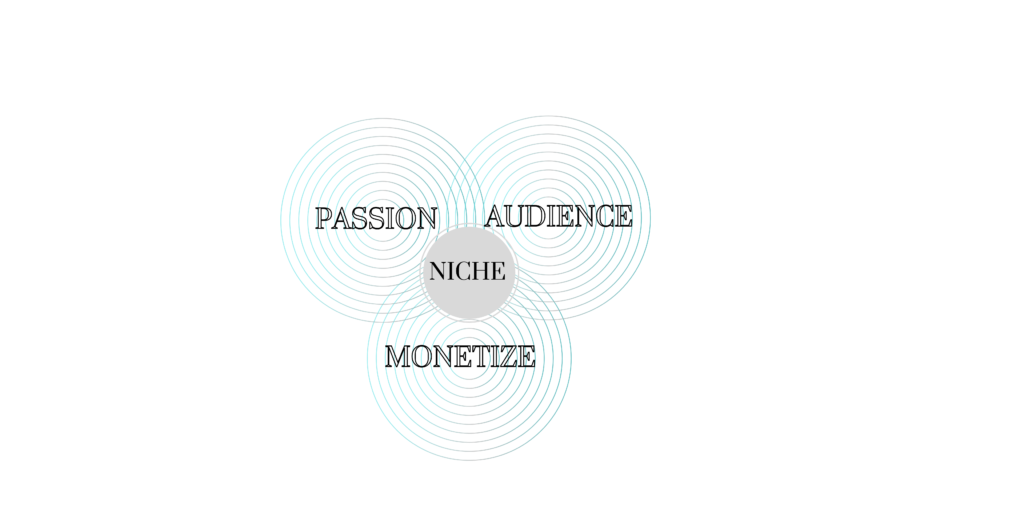
A good way to narrow down your niche is to think about:
- What are you passionate about?
- Who do you want your audience to be?
- How do you want to monetize your blog?
Answering those questions, see where they overlap. Combining those three things will guide you to your perfect niche.
Related Article: Choosing A Blog Niche
To help get you started, I've created a FREE blog niche guide with over 300 niche ideas
II. Create Blog
*We’re going to jump into the technical steps here now. Feel free to follow along step by step below or save this article for just the specific setup instructions.
Create Domain Name
A domain name is essentially the name of your blog.
This is a fun one! This is the starting point of your creativity for your blog. You can pick a title that directly represents your niche, or you can choose a more vague one that gives you the flexibility to change or expand your niche later (aka what I did with Twenty Three & Ivy).
You want to pick something that is catchy or easy to remember so people will think to come back to your blog for more information. This can actually be pretty tricky. I suggest writing down words or titles you like the sound of, then google synonyms to get more options. Then try different combinations until you find one you like.
Keep in mind a URL will not allow any spaces so make sure when combined in a URL your name doesn’t combine to form words you didn’t expect. Sounds straight forward but maybe have another person read your URL and give you their first impression just in case.
I probably spent a whole day messing around with domain name ideas before I came up with Twenty Three & Ivy. Nothing fancy but rolls off the tongue nicely I think.
I recommend typing domain names into a quick google search as you think of them to see what comes up. This will show you whether that domain name is already taken or if it leads to a google search you don’t want to be associated with.
You want to make sure if someone is googling your blog, they can find you easily without too many other closely named sites.
Following into the next step, you’ll be able to buy and own your specific domain name in the next step.
Essentially, you are creating a brand with your blog domain name, so make sure it’s one you love.
Use the link below to check if your domain name is available
Sign Up For Hosting
Now, these next two steps kind of go hand in hand. Starting out, unless you’ve created a website before, this will sound totally foreign. That is totally fine. It’s easier than it seems.
To start, a web host is basically going to be your blog’s hard drive. It’s going to be the place that all of your data is stored.
If you plan on monetizing your blog then it is very important to set up a self-hosting blog. This basically means, make sure you purchase a hosting site instead of using a free blog.
As tempting as a free blog sounds, if you’re serious about making money you’ll need to opt for the self-hosted blog.
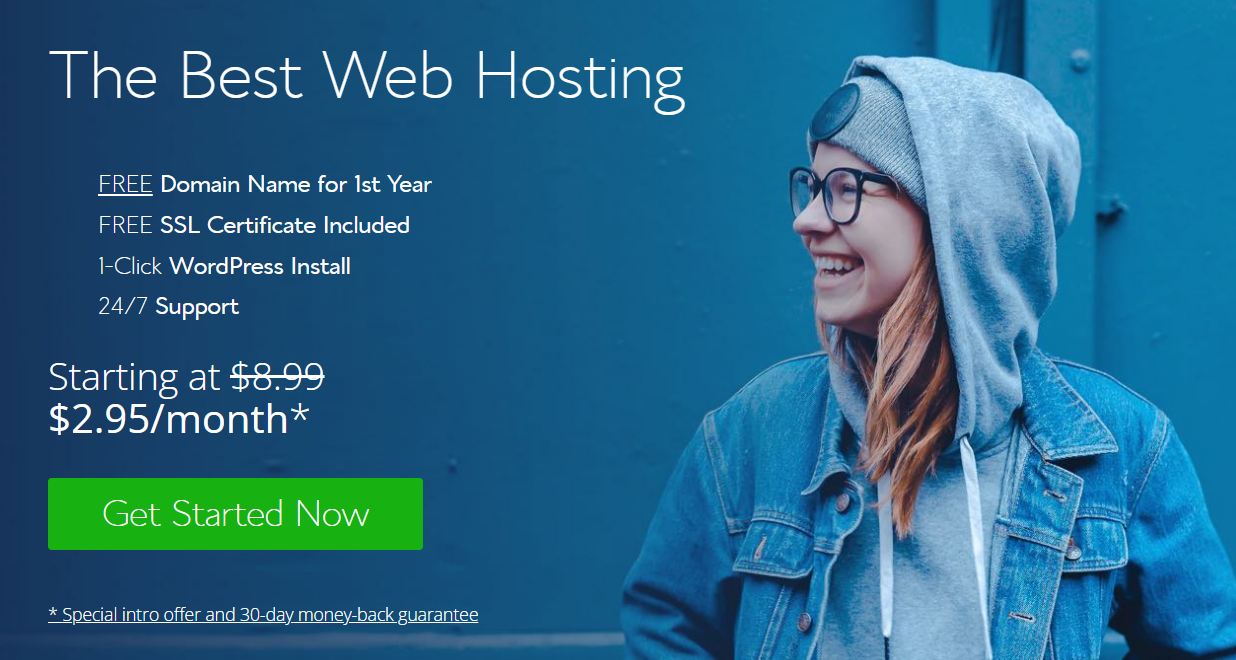
Now I started my blog being very doubtful if I could be successful, so I didn’t want to drop a lot of money on my newest rash idea. Luckily this turned out to be a great decision and for only $2.95 a month I was able to purchase my hosting website.
***Note: When I got hooked on the idea of starting a blog, I didn’t realize I’d need to pay upfront just to try to be successful. This was a hard pill for me to swallow. So to be transparent, a blog is not free. Purchasing your domain name and hosting site is a must. But it is a commitment that can encourage you not to give up and see your dream through since you’ve already committed to it financially***
The hosting site I first signed up for, continue to use, and highly recommend is Bluehost.
Bluehost is one of the most affordable hosting sites. This is also where you can purchase your domain name.
PS: The domain name comes free when you sign up for a Bluehost subscription.
Signing Up For Bluehost
Alright so enough chit chat, let’s start walking through this process.
- Click here to head over to Bluehost to claim your $2.95 a month plan
- Once redirected to Bluehost, click on the ‘Host Your Site’ button
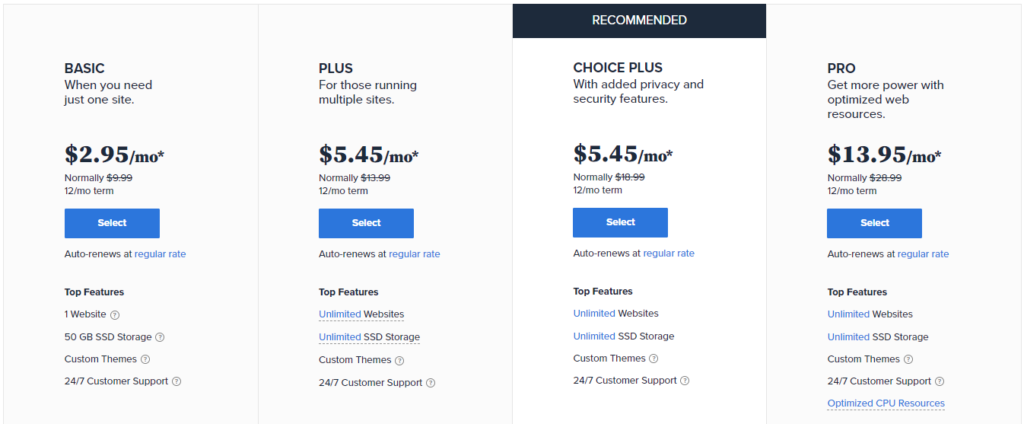
- You’ll then see the different plans Bluehost has to offer. They have a link on that page to compare all plans. Starting off you’re fine to start with the Basic plan, you can always upgrade later on if needed.
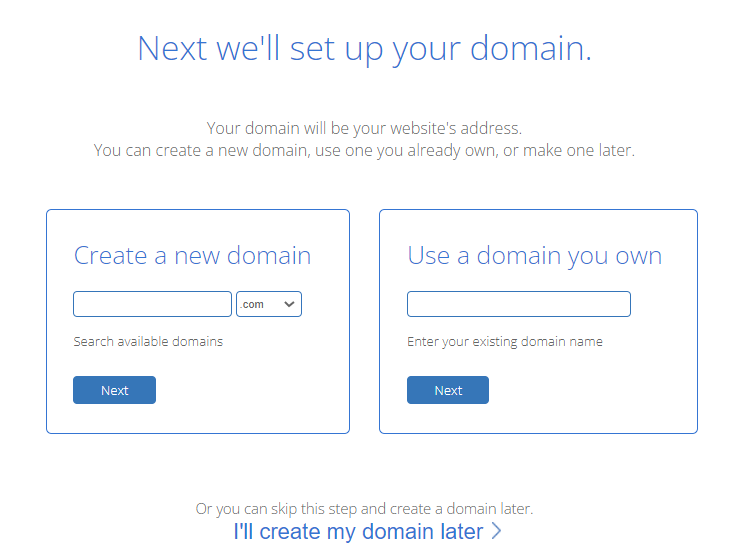
- After selecting your plan it’s time to set up your domain (an option to skip this for now as well if you need)
- Creating your new domain, just enter your domain name on the left and click ‘Next’. — If you already own your domain elsewhere, enter it on the right and continue with ‘Next’.
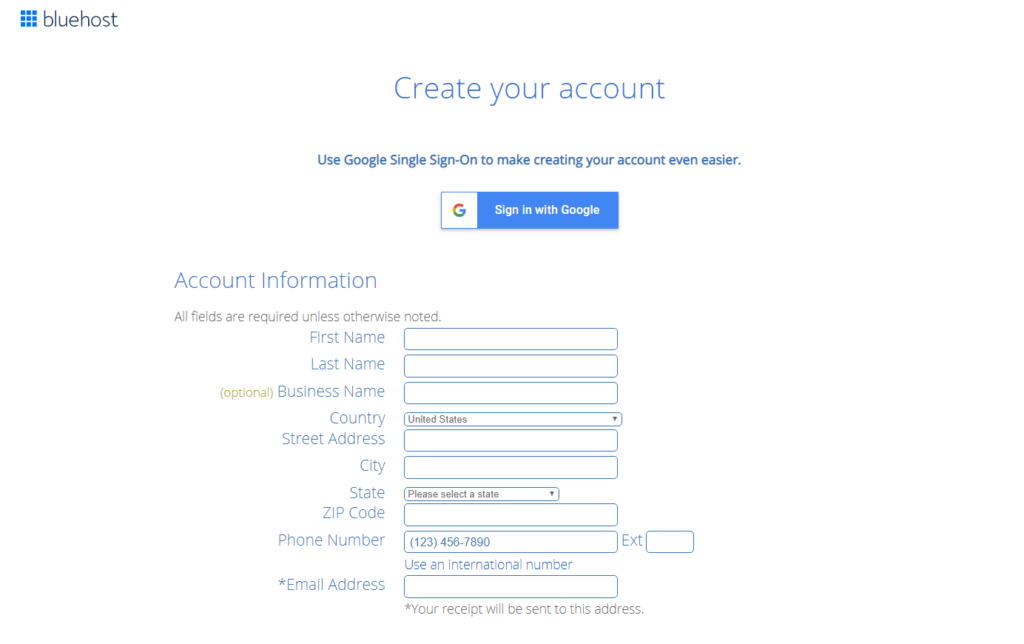
- Now you just need to enter your account details and information.
- You can link your Google account to avoid manually entering all the information as well.
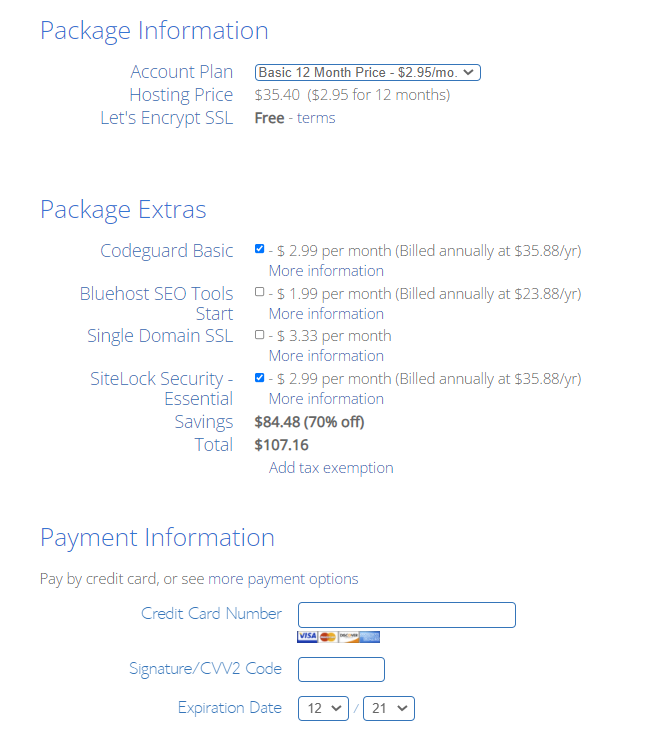
- After entering your details scroll down to the package pricing field. Here you will see your $2.95/mo 12 month plan. Make sure to uncheck any ‘Package Extras’ that you do not want to include.
- Enter your billing information and submit.
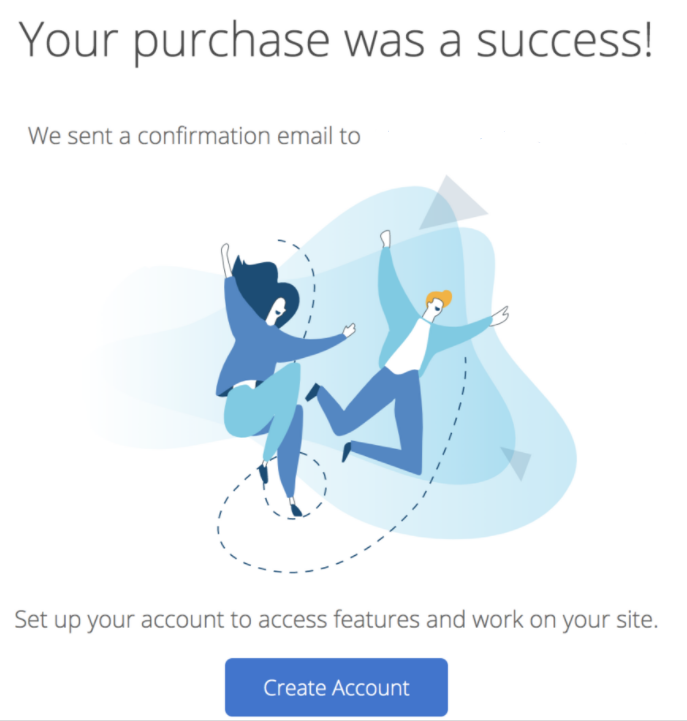
- After payment you’ll receive a confirmation page + email.
- Continue by clicking ‘Create Account’.
- Now you’ll need to create a password for your Bluehost account.
- Finally! You’re all set now to log into your new hosting website.
Choose Blogging Platform
At this point you officially own your blog name and have a hosting site. Now you need to add on your blogging platform that will allow you to create your website.
Think of it as if you’re trying to write a paper on your computer, your hosting site is your laptop -holding all the data, and now you need Microsoft Word – to be able to format your text – this is your blogging platform.
I highly recommend WordPress.org.
WordPress is going to be your blogging platform you’ll install so you can do all the website formatting and editing. Every part of your blog will be created through WordPress.
This is an easy step, once you sign up for Bluehost you can instantly install WordPress for free.
Just make sure you’re using WordPress.org not .com. Wordpress.com is the free site that is not what you want to use if you’re looking to monetize your blog. If you’ve signed up for Bluehost though they will automatically install WordPress.org with a click of one button making it very simple.
Install WordPress
Bluehost will actually automatically install WordPress for you, you just need to choose your password.
- WordPress will ask you to choose a theme. You can always change this later.
- Once you pick a theme click ‘Get Started’.
- Bluehost will walk you through a quick checklist then click ‘Launch My Site’ to officially make your blog website public!
- You’ll now be redirected to WordPress where you can fully edit and customize your website.
Note: Bluehost has a ‘Live Chat’ button on their website if you need any additional help along the way.
Congratulations!!
You have officially created your own website
and are ready to start creating.
Everything you need to design your website and blog posts will be handled through WordPress.
Don’t be intimidated by WordPress!
It looks meaner than it is at first. Just give it time. The more you play around in it the easier it’ll become. We’ll dive deeper into WordPress below.
WordPress
Woo hoo! Your website finally exists! Now let’s talk about WordPress and how to use it.
Log In
To get to the WordPress website to log in, type your URL followed by /wp-admin, once there enter your username and password.
I recommend to bookmark this page as this is how you’ll sign into your website from here on out.
*Note: after initially setting up your account it may take a day or so before you can log in directly. If you encounter this, sign in through BlueHost and then click on ‘Log into WordPress’ to navigate to WordPress.
Posts
This is where you will create all of your blog posts for your website. To create a new post just click on ‘Add New’.
I prefer to use Elementor to edit all of my blog posts. I’ll go into detail below for this. It just makes it more user-friendly to drag and drop areas you want text or images in your blog posts vs editing directly in the WordPress interface.
Media
Here you will see any images you have uploaded anywhere within your website.
This is an easy way to find any images you’ve used throughout your blog.
Pages
Pages are similar to Posts, where it’s a blank slate for you to create. However, Pages are used as the main static pages of your website.
So instead of blog posts, these pages would be:
- Home Page
- About Me
- Contact Page
- Legal Pages
- Legal pages are necessary pages all blogs must have such as: privacy page, disclaimer, terms & conditions
Appearance
Here is where you can choose and install a theme for your website. You can customize menus and sidebars.
Plugins
Plugins are additional software that you download to add more functions to your blog. Basically, if your blog is a phone, plugins are the apps on your phone.
This allows you to have more features without needing to know how to hard code a website.
Some plugins I recommend:
- Elementor – HIGHLY RECOMMEND – this plug-in allows you to edit your blog through a more user-friendly interface than WordPress. I’ll go into more detail later in this post.
- Elementor Header & Footer Builder – This easily allows you to create your header/footer on your blog post.
- Google Analytics – This shows you your blog data such as how many page views, duration of page visits, which pages are getting the most views etc.
- Akismet Anti-Spam – protects your blog from spam
- UpdraftPlus – This will back up all of your blog data and allow you to restore it if anything goes wrong.
- Yoast SEO – This helps your blog get found using SEO optimization. It’ll help when creating titles or descriptions on your blog.
Settings
Another step of setting up your blog is going to involve updating a view of the fields under settings. There are quite a few tabs under here but the important ones to update are under the General and Permalink tabs.
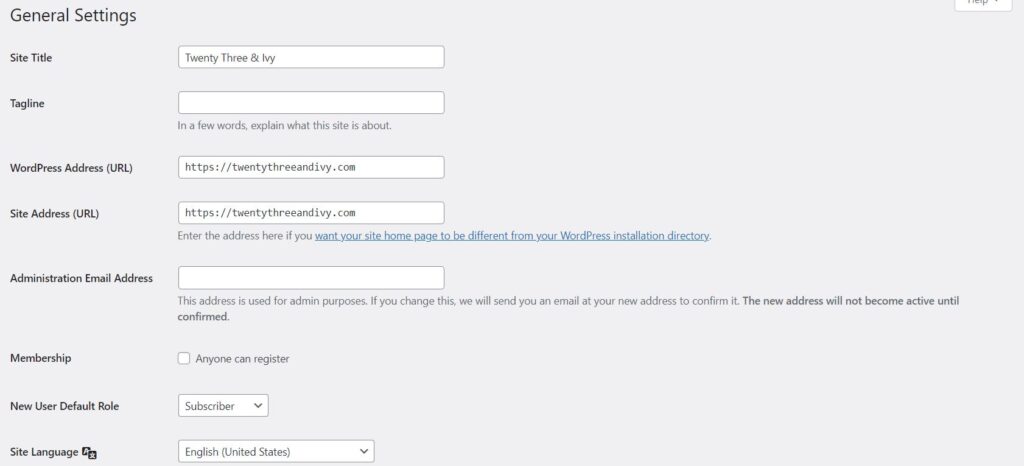
General – Make sure the fields under this tab are correct based on your blog.
Important fields are:
- Site Title – set to the name of your blog.
- WordPress Address & Site Address (URL) – set to your blog URL.
- Administration Email Address – set to your personal email address.
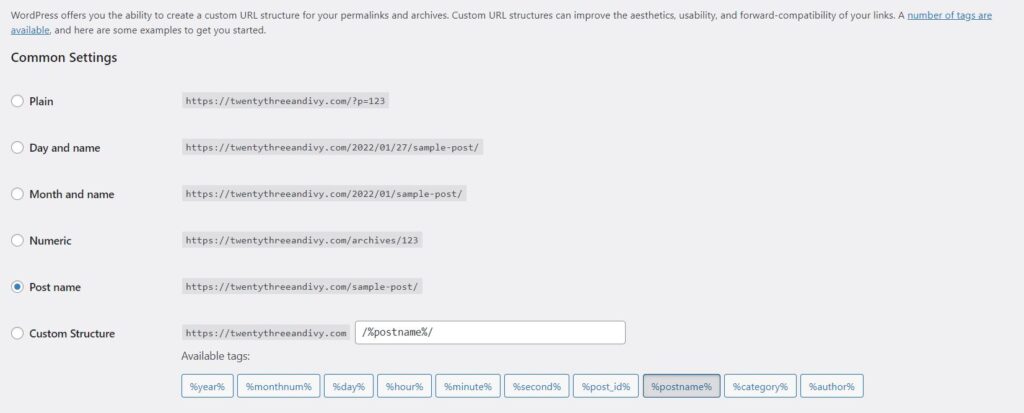
Permalinks – A permalink is a permanent link to a page of your website, each blog post you create will have its own permalink.
It’s important that these are set up to make them rank better with SEO so people can more easily find your posts.
WordPress has a few setting options, we’re going to want to use the Post Name option set up as:
Post Name: https://(domain).com/(post-title)/
Set Up Website & Install Theme
You officially own your website name and URL. Now it’s time to actually create your website!
The first step is going to be to install a theme. This will be your basic website design draft providing a layout, fonts, colors, menus etc.
When you install your theme, you’ll automatically get the template information for the draft website. You can go ahead and delete the fields you don’t want or edit the text to fit your blog right away.
There are many free themes you can choose from, you don’t need to pay for a fancy theme right at the beginning. Later down the road, you can purchase a premium theme that will allow more customization for your blog.
Don’t get held up trying to have a perfect website from the start!
Just get a basic theme and layout to start and edit slowly as you build your content.
Installing a theme:
- Go to Appearance > Themes
- Here you will see themes already available, or click on Add New to find more themes
- Select a theme and click Activate
- Return to your dashboard and visit your site and you’ll see the new theme installed
Now when I first installed my theme I had no idea where to start. I didn’t know how to edit the text or change photos, nothing. WordPress is wonderful….. after playing around with it a couple of times. But unless you’ve built a website from scratch before… I’m sorry but it is confusing!! That’s the truth.
That is okay though! And if you’re currently struggling through this step as well in your blogging journey know that it’s okay. This is something new you are learning. It does get easier!
I don’t know how it happened but one day it just clicked for me. Every time I went to edit my blog it became easier and easier and overall just so much more fun!
The best thing I can recommend is installing the Elementor plugin.
Installing Elementor
I’d be dead in the water without this wonderful add-on.
Elementor gives you a different version of an editing system for your blog. I found this much easier than the WordPress editor at first. You’ll still be able to edit through both systems. You’ll figure out when and where to use each one based on your preferences.
If you take just one piece of information from this page, let it be installing Elementor.
You can fully get by with the free version.
Install Elementor:
- Go to the Plugins tab
- Click on Add New
- In the search box, enter ‘Elementor’and choose ‘Elementor website builder‘ to install
- Once installed, click on ‘Activate’

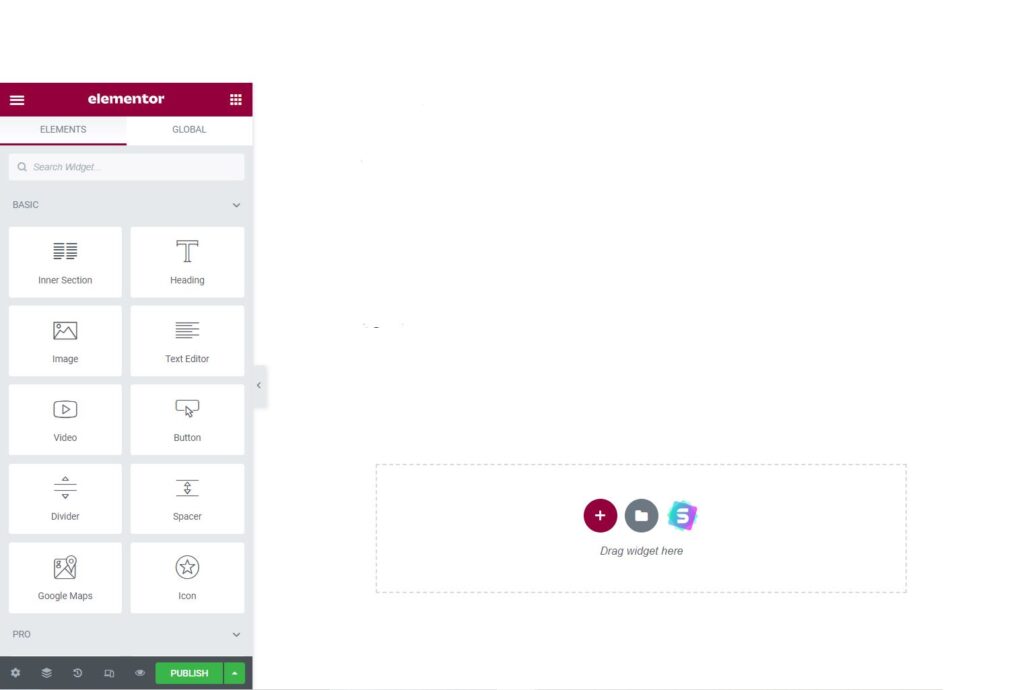
Using Elementor Editor
Below is a little screenshot of what the Elementor editor screen looks like for a new post. Here you can easily drag and drop a widget from the left side menu to the dashed rectangle area on the right side.
For example, you can drag over the Heading widget and begin typing in that new box. Similarly, drag over the Image widget and insert any photo to your post.
Within each widget there are additional options for font, colors, margins, backgrounds, etc.
Take your time playing around and you’ll slowly find every function you need to design your website exactly how you envision it.
III. Create Content
Write Blog Posts
Now before you go and want to spend all your time just making your blog website look cool and pretty, I highly highly recommend writing 5-10 blog posts before you do anything else.
It’s easy to get sucked into just setting up your blog layout and design, but essentially a blog cannot be a blog without blog posts! You can’t design your website unless you have some blog posts to link to and design around.
I started with about 5 blog posts and realized that I needed to write at least 5 more in order to have my blog look professional from the very start.
The more posts you have written, the easier it is to figure out how you want to format your website with photos and links between pages etc trust me.
To create a new blog post:
- Navigate to Posts
- Click ‘Add New’
Here you can input your blog post content in the main space.
Scrolling down make sure to add keywords and a meta description to optimize Google SEO. This will help others find your web pages easier.
Here you can also edit your slug aka the URL for your post. This will look something like
www.com/this-here-is-your-slug/
When you’re ready you can Save Draft or Publish (make public) by clicking at the top right of the page.
I personally use Elementor to edit all of my blog posts.
You can click on ‘Edit with Elementor’ at the top of the page to navigate into the Elementor editor.
Be sure to click ‘Update’ at the bottom left of the Elementor editor screen to save and update your blog post. Or you can click the up arrow next to the update button and click ‘Save Draft’ instead. This will save without making your changes live yet.
All of your blog posts will be saved and available under the Posts tab.
IV. Design Website
Now that you have a theme, some blog posts and the Elementor plugin set up, you are ready to start designing your website!
If you’re a creative person this is the best part. You get to watch your blank website go from a empty template to your personal blog entirely designed by you, no restrictions.
Your blog doesn’t need to be perfect before you launch it and make it available to the internet world. You just want to make it look as professional as possible without forgetting your main goal.
The main goal being write blog posts and monetize that blog!
It’s important to have a nice looking website for sure, but you don’t want to waste all of your time designing a blog that isn’t currently set up to make any money.
You want to have people visiting your blog and reading your posts as soon as possible.
If you use Pinterest for traffic, people might just be visiting your blog for one singular post and then leaving. They’re not worried about what font you used on your home page. They just want that information you’re giving them in your blog posts.
Besides your blog posts, the most important blog pages to have set up are going to be your Privacy Policy, Disclaimer, and Terms & Conditions pages.
Privacy policies are legally required to let your readers know what information your website is collecting from them and how it is being used.
Your disclaimer is to let your readers know that you cannot be held legally responsible for any information you publish and that they should not rely solely on what they read on your blog. Basically, you’re writing from your own perspective, not trying to pretend you’re a trained professional giving advice.
Terms & conditions is where you can disclose if you’re using any affiliate marketing and how your blog can be used. You can state how your information can be used while stating your Copywrite agreement.
Now as a new blogger, this can all seem overwhelming. I’m all for winging things until you learn what you’re doing. However, I would not recommend gambling with legal things.
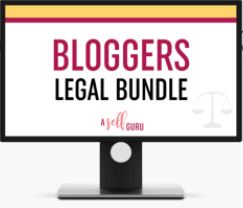
My head was spinning trying to figure out what a proper legal page needed until I found Amira’s blog, A Self Guru.
As a lawyer, she’s created wonderful legal pages that you can directly use for your personal website or blog.
This takes all the confusion out of this process and keeps you protected. I would highly recommend checking out Amira’s legal bundles. She’s created the bundle below specifically for bloggers.
Once you have that legal page set up you can create the rest of your blog website as you please.
I recommend scrolling through Pinterest yourself. Check out other blogs within your niche and see all the different ways a blog website can be set up.
Do you like the look of menus on a blog? Do you want links to your blog posts on the home page or do you want a separate blog page altogether?
If you’re like me, I started not even knowing what most blogs looked like! So take time to learn before you try to design your own blog.
V. Gain Traffic
Once you’ve got your website and blog posts all set up and your blog launched it’s time to bring in the readers. Afterall, traffic will inevitably mean more money. All your money making strategies will mean nothing unless you have readers clicking those links or buying those products.
You might have already noticed a few readers here and there stopping by. Nothing is hidden on the internet so it’s not uncommon to have people stumble upon your website before you’ve even tried to get eyes on the page.
I know seeing those first few readers made me highly motivated to step up my blogging game and get some real traffic flowing through.
Pinterest will become your new favorite website to promote on.
Pinterest makes it super easy to put up a nice cover photo and post a link to your blog gaining you plenty of readers in no time at all.
There are great tools to use with Pinterest such as:
- Canva – Here you can create logos, banners, Pinterest pins, and any other images for your blog. They have tons of pre-designed templates for you to use or build your own from scratch. Very user-friendly.
- Tailwind – Works hand in hand with Pinterest, allowing you to automate pinning your posts. Making pinning easier and saving you time.
I’m not personally on any social media platforms but if that’s something you are interested in it can be another easy way to get word out about your blog.
Don’t be shy, you created this wonderful new blog now get it out into the world!
VI. Monetize
This step goes hand in hand with the previous step. You need traffic and readers to make your blog monetizing strategies amount to anything, but ultimately you need to have those tactics laid out from the start to optimize your profits.
There are many ways to monetize a blog.
- Affiliate Links – Using affiliate links can set you up with great passive income from the start. If you have great content and promote truly worthy affiliate links to your readers, then you can start making good money from a low number of readers.
- Advertisements – are another passive income strategy. It’ll take time to build up the traffic to your blog to see the perks of ads, but in the long run every little bit adds up when you’re trying to monetize.
- Digital Products- You can also create ebooks/courses that can be promoted via your blog or emails and digitally downloaded if your readers decide to puchase.
- Sponsored Content – Once you have an audience brands may pay you to promote certain products to your readers.
It’s important to try out different monetization strategies and see what works best for you and your blog. This will not be a one size fits all across all blogs.
If you search Blog Income Reports on Pinterest you can see other bloggers who are sharing their monetizing strategies and see what they’re making based on their number of page views/traffic.
While you shouldn’t expect to duplicate their results, it can be an encouraging way to know that it is possible to make money through blogging.
Related Article: How Do Blogs Make Money
It won’t be easy to learn and create all of this yourself right from the start. That is to be expected with anything new. Just do not give up! Break things down into small steps and slowly work through them.
Take pride in the small accomplishments you make.
Do not be discouraged if you don’t have 100K visitors after one day/week/month, remember blogging is a long-term investment, not a get-rich overnight scheme.
Keep putting in the work and watch all of your efforts snowball into the online business you’ve dreamed about.
More Posts

")