Blog
How To Create Your Own Blog
Step By Step - Technical Guide
Posted By: Twenty Three & Ivy
-This post may contain affiliate links in which I would receive a small commission if you purchase through a link, at no cost to you-
Ready to start blogging?
The first step is ultimately deciding that you’re ready to invest your time and start a blog.
There are articles everywhere telling you how easy it is to start blogging and make money online. So why can’t you do that as well right?
The truth is, yes you can make great money through an online blogging business, but you have to treat it like a business. And that includes all the hard work and time put in that a new business needs.
From the beginning, I told myself that once I figured out how to run my own successful blogging business, I would create a whole blog dedicated to teaching others. While the steps are not overly complicated, they can be very time-consuming and confusing as to where to begin!
Yes you need to create great content, gain traffic, promote on Pinterest, create digital products or use affiliate link etc etc. but FIRST you need to start small. Take things step by step in order. You don’t need to worry about promoting on Pinterest if you don’t have articles to share…. and you can’t create great blog articles without a blog.
So let’s start from the very beginning.
For the grand overview of the main steps to creating a blogging business, check out this article.
Step By Step Technical Guide
How To Physically Create Your Blog
Step 1. Name Your Blog
The name of your blog is also known as your ‘domain name’.
This is the starting point of your creativity for your blog. Choose a name that will represent your blog and ultimately your blogging brand.
If you’re not 100% committed to a blog niche yet. You can pick a general domain name that will allow you to write about a variety of topics. Like I did with Twenty Three & Ivy.
Things to keep in mind:
- A URL link will not allow any spaces. Make sure your domain works when no spaces are included.
- Use .com for your website, this will make it easier for others to find you.
- Don’t use odd spellings, again this will make it hard for people to search for you.
- DO A GOOGLE SEARCH – might be the most important bit. Search your potential domain name and see what pops up. 1. to see if that domain is already taken, and 2. to check what other websites might show up when someone is searching for your site.
Once you’ve decided on your blog name, you’ll be able to buy and own your specific domain name in the next step.
Essentially you are creating a brand with your blog domain name, so make sure it’s one you love.
**If you’re absolutely stuck on a domain name, Bluehost allows you to continue to set up your blog without a domain name and still claim your free domain later on once you’ve decided**
–Use the link below to check domain name availability.
Step 2: Purchase Web Hosting
If you’re totally new to blogging, don’t be scared by the technical jargon.
Web host is basically going to be your blog’s hard drive. It’s going to be the place that all of your data is stored.
If you plan on monetizing your blog then it is very important to set up a self-hosting blog. This means, make sure you purchase a hosting site instead of using a free blog.
***Note: When I decided to start a blog, I didn’t realize I would need to pay upfront in hopes of being successful. This was a hard pill for me to swallow. So to be fully transparent, a blog is not free. However, purchasing your domain name and hosting site is a must.**
The hosting site I first signed up for, continue to use, and highly recommend is Bluehost.
Bluehost is one of the most affordable hosting sites. This is also where you can purchase your domain name.
Bluehost is the #1 recommended web hosting company by WordPress.org.
Signing Up For Bluehost
Alright so enough chit chat, let’s start walking through this process.
- Click here to head over to Bluehost to claim your $2.95 a month plan
- Once redirected to Bluehost, click on the ‘Host Your Site’ button
- You’ll then see the different plans Bluehost has to offer. They have a link on that page to compare all plans. Starting off you’re fine to start with the Basic plan, you can always upgrade later on if needed.
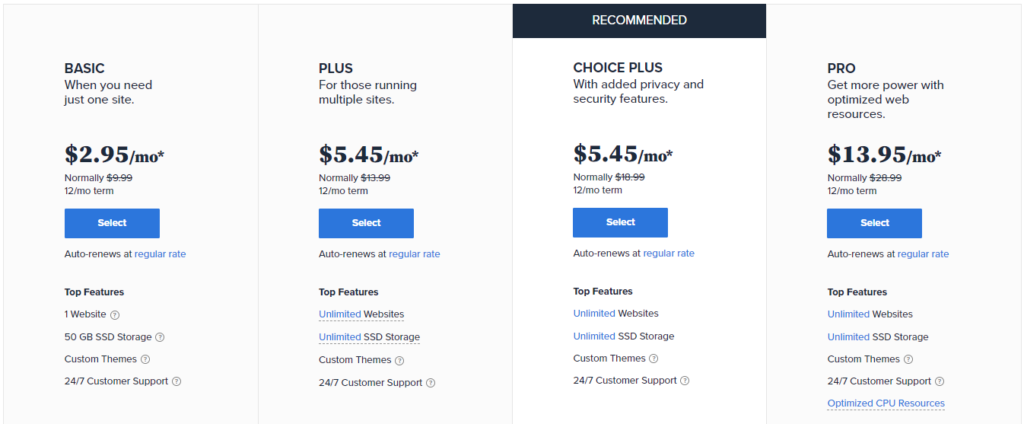
- After selecting your plan it’s time to set up your domain (an option to skip this for now as well if you need)
- Creating your new domain, just enter your domain name on the left and click ‘Next’. — If you already own your domain elsewhere, enter it on the right and continue with ‘Next’.

- Now you just need to enter your account details and information.
- You can link your Google account to avoid manually entering all the information as well.
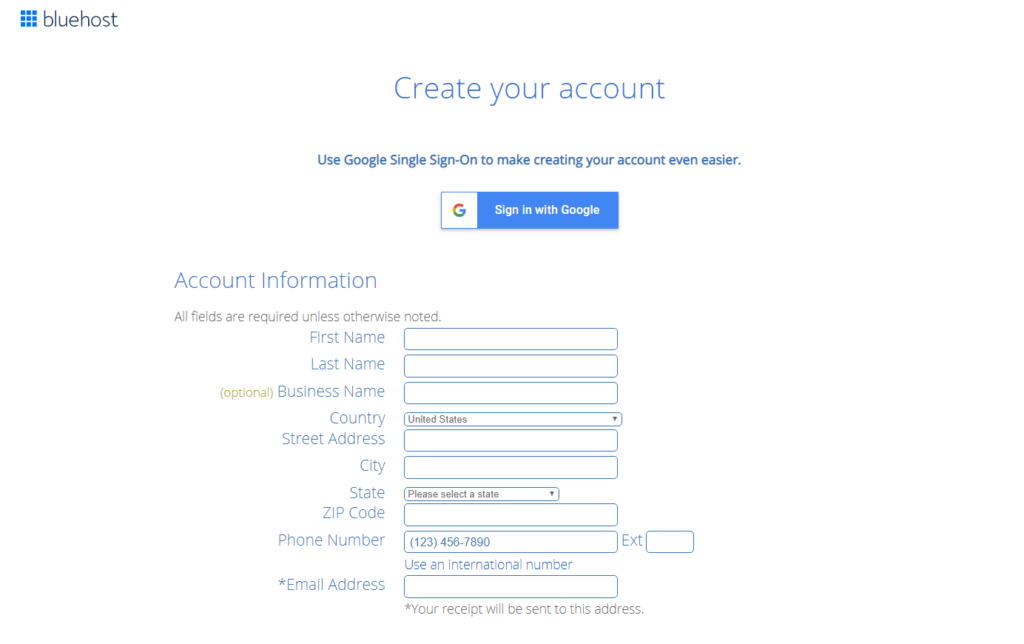
- After entering your details scroll down to the package pricing field. Here you will see your $2.95/mo 12 month plan. Make sure to uncheck any ‘Package Extras’ that you do not want to include.
- Enter your billing information and submit.

- After payment you’ll receive a confirmation page + email.
- Continue by clicking ‘Create Account’.

- Now you’ll need to create a password for your Bluehost account.
- Finally! You’re all set now to log into your new hosting website.
Step 3: Choose Your Blogging Platform
At this point you officially own your blog name and have a hosting site. Now you need to add on your blogging platform that will allow you to create your website.
Think of it as if you’re trying to write a paper on your computer, your hosting site is your laptop -holding all the data, and now you need Microsoft Word – to be able to format your text – this is your blogging platform.
I highly recommend WordPress.org.
WordPress is going to be your blogging platform you’ll install so you can do all the website formatting and editing. Every part of your blog will be created through WordPress.
This is an easy step, once you sign up for Bluehost you can instantly install WordPress for free. YES FREE!
Install WordPress
Bluehost will actually automatically install WordPress for you, you just need to choose your password.
- WordPress will ask you to choose a theme. You can always change this later.
- Once you pick a theme click ‘Get Started’.
- Bluehost will walk you through a quick checklist then click ‘Launch My Site’ to officially make your blog website public!
- You’ll now be redirected to WordPress where you can fully edit and customize your website.
Note: Bluehost has a ‘Live Chat’ button on their website if you need any additional help along the way.
Congratulations!!
You have officially created your own website
and are ready to start creating.
Everything you need to design your website and blog posts will be handled through WordPress. Don’t be intimidated by WordPress! It looks meaner than it is at first. Just give it time. The more you play around in it the easier it’ll become. We’ll dive deeper into WordPress in another article but one last quick note.
Install the Elementor plug in for WordPress. That will be your holy grail (;
